Wednesday, December 15, 2010

Hide RSS Feed Title in RSS Viewer Web Part

In this blog post, I will show you how to hide that irritating RSS feed title you get when using the RSS Viewer web part in SharePoint 2010, as shown here:


Upon editing the RSS Viewer web part, open the XSL Editor. Under the "RSSMainTemplate" section, comment out the following lines shown here:

Should look good now.

Wednesday, November 10, 2010

SharePoint Site Request Form (InfoPath 2010)

For those interested, I have created a typical SharePoint Site Request Form in InfoPath 2010. Feel free to download and use as you wish.

Here is a screenshot of the form:


You can download the template here.

Monday, August 2, 2010

Configure database mirroring on dedicated NICs for SharePoint 2010

If you are considering using the newly supported database mirroring capabilities in SharePoint 2010, I would recommend using a dedicated network interface card (NIC) for each SQL server in the database mirror. This means that each database server will have two NICs with two IP addresses, and the database mirroring logs will be mirrored on one NIC while the other NIC accommodates all other traffic for each respective server. See below for step-by-step instructions on how to establish database mirroring using dedicated NICs in SQL Server 2008.

For my example environment, I will use the following:

Principal Configuration:

Server Name: SQL1
SQL Instance: SQL1\PRINCIPAL
NIC 1: 192.168.0.100
NIC 2: 192.168.0.101

Mirror Configuration:

Server Name: SQL2
SQL Instance: SQL2\MIRROR
NIC 1: 192.168.0.102
NIC 2: 192.168.0.103

Witness Configuration:

Server Name: SQL3
SQL Instance: SQL3\WITNESS
NIC 1: 192.168.0.104

1. Create DNS record for the dedicated NIC (NIC 2) on each server.

sql1-pri.domain.local 192.168.0.101
sql2-mir.domain.local 192.168.0.103

On each server, ping the newly created host name of the opposite server to ensure it resolves correctly. Therefore, on SQL1 (the principal), ping sql2-mir (the mirror) to ensure it resolves to the proper IP address. Repeat for SQL2.

2. Create a mirroring endpoint for the IP address of NIC 2 on the principal and mirror servers, and for the witness server. Below is the general syntax for the endpoint configuration.

CREATE ENDPOINT
STATE=STARTED
AS TCP (LISTENER_PORT=,LISTENER_IP=)
FOR DATABASE_MIRRORING (ROLE=PARTNER);

In my example environment, I would configure the following:

On the Principal server:

CREATE ENDPOINT Endpoint_Mirroring
STATE=STARTED
AS TCP (LISTENER_PORT=5022,LISTENER_IP=(192.168.0.101))
FOR DATABASE_MIRRORING (ROLE=PARTNER);

On the Mirror server:

CREATE ENDPOINT Endpoint_Mirroring
STATE=STARTED
AS TCP (LISTENER_PORT=5022,LISTENER_IP=(192.168.0.103))
FOR DATABASE_MIRRORING (ROLE=PARTNER);

On the Witness server:

CREATE ENDPOINT Endpoint_Mirroring
STATE=STARTED
AS TCP (LISTENER_PORT=5022)
FOR DATABASE_MIRRORING (ROLE=WITNESS);

Next, you must grant connect permissions to the SharePoint service account on each SQL server endpoint you just created:

GRANT CONNECT ON ENDPOINT::Endpoint_Mirroring TO [domain\sp_service];

NOTE: If a database mirroring endpoint exists and is already in use, I recommend that you use that endpoint for every session on the server instance. Dropping an in-use endpoint disrupts the connections of the existing sessions. If a witness has been set for a session, dropping the database mirroring endpoint can cause the principal server of that session to lose quorum; if that occurs, the database is taken offline and its users are disconnected. Determine if a database mirroring endpoint already exists by using the following statement on each server:

SELECT name, role_desc, state_desc FROM sys.database_mirroring_endpoints

3. On the principal server, perform a full backup of each database and its associated transaction log you want to mirror.

a. Open SQL Server Management Studio.
b. After connecting to the appropriate instance of the Microsoft SQL Server Database Engine, in Object Explorer, click the server name to expand the server tree.
c. Expand Databases, right-click the desired database, point to Tasks, and click Back Up. The Back Up Database dialog box appears.
d. In the Database list box, verify the database name.
e. Ensure the recovery model is set to FULL.
f. In the Backup type list box, select Full. For each transaction log backup, select Transaction Log.
g. Either accept the default backup set name suggested in the Name text box, or enter a different name for the backup.
h. Choose the Disk backup destination type, and select the Add button to find and select the location where the backup will be placed. The selected paths are displayed in the Backup to list box.
i. Select OK.

4. Restore each database and transaction log backup to mirror server.
a. Open SQL Server Management Studio.
b. After connecting to the appropriate instance of the Microsoft SQL Server Database Engine, in Object Explorer, click the server name to expand the server tree.
c. Right-click on the Databases folder, and select Restore Database. The Restore Database dialog box appears. To restore each transaction log, right-click on its restored database, select Restore, Transaction Log.
d. To specify the source and location of the backup sets to restore, select From Device.
e. Click the browse button, which opens the Specify Backup dialog box. In the Backup media list box, select to Add a File backup media type. Browse to the appropriate location, and select the backup file. Select OK.
f. Ensure the name of the restored database is the exact same as on the principal server.
g. Place a checkmark to select the backup set to restore.
h. Select Options located on the left menu under General, and choose the following option:
Leave the database non-operational, and do not roll back the uncommitted transactions. Additional transaction logs can be restored. (RESTORE WITH NORECOVERY)

5. For each database that you want to mirror, configure the following on each respective server:

ALTER DATABASE
SET = 'TCP://new host name:port'

In my example environment, I would do the following to mirror the SharePoint_Config database:

On the mirror server:

ALTER DATABASE SharePoint_Config
SET PARTNER = 'TCP://sql1-pri.domain.local:5022'

On the principal server:

ALTER DATABASE SharePoint_Config
SET PARTNER = 'TCP://sql2-mir.domain.local:5022'

Next, on the principal server, set the witness:

ALTER DATABASE SharePoint_Config
SET WITNESS = 'TCP://sql3.domain.local:5022'

6. Manually test the failover capability of the mirror:
a. On the principal server, in SQL Server Management Studio, right-click the mirrored database and select Properties.
b. Select Mirroring on the left menu.
c. Click the Failover button. Select Yes when prompted to confirm.

7. Add the failover server (SQL2) for each SharePoint database you have mirrored. I recommend using PowerShell to complete this task, and Todd Klindt has great step-by-step instructions in a blog post located here.

8. Test the automatic failover capability of the mirror by shutting down the principal server. You will notice that the mirror server will become the principal server while continuing to host database operations. Power on the principal server. Any database changes made on the mirror server will be restored to the principal server. Next, shut down the mirror server so the principal server can once again become the primary server. Power on the mirror server.

ALL DONE.

Friday, July 23, 2010

SharePoint 2010: User Profile Synchronization Service will not start when using Named Instance in SQL Server 2008

While deploying a SharePoint 2010 farm recently in which I implemented database mirroring in SQL Server 2008 using two servers with a Named Instance respectively for each server (SQL1\PRINCIPAL and SQL2\MIRROR), I could not get the User Profile Synchronization Service to start. It would remain in a status of “Starting” for about 10 minutes before eventually showing a status of “Stopped”.

A quick glance on the ULS logs and I discovered the following errors:

ERROR ILMPostSetupConfiguration: ILM Configuration: Validating installation of SQL Service FAILED

and

ILM Configuration: Error 'ERR_CONFIG_DB'

and

UserProfileApplication.SynchronizeMIIS: Failed to configure MIIS post database, will attempt during next rerun. Exception: System.Configuration.ConfigurationErrorsException: ERR_CONFIG_DB at Microsoft.Office.Server.UserProfiles.Synchronization.ILMPostSetupConfiguration.ValidateConfigurationResult(UInt32 result) at Microsoft.Office.Server.UserProfiles.Synchronization.ILMPostSetupConfiguration.ConfigureMiisStage2() at Microsoft.Office.Server.Administration.UserProfileApplication.SetupSynchronizationService(ProfileSynchronizationServiceInstance profileSyncInstance). 1125abef-5af4-4214-93c5-4d74e8d103fb

After reading through dozens of blog posts, especially this one, I determined that the Forefront Identity Manager Synchronization Service (FIMSynchronizationService) was trying to connect to the Default Instance of SQL1, instead of the correct Named Instance of SQL1\PRINCIPAL. Not sure if this is default behavior out of the box, but sure seems to be that way.

The Workaround – configure a SQL alias on the application server. Here’s how:

On the SharePoint application server that you want to start the User Profile Synchronization Service on, perform the following:

1) Open the SQL Server Client Network Utility.


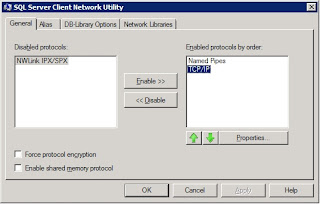
On the General tab, ensure you enable the Named Pipes and TCP/IP protocols.

2) On the Alias tab, select to Add a new alias.


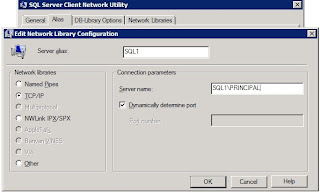
Ensure TCP/IP is selected as the Network library protocol. For the Server alias, type the name of the SQL server. For me, it was the principal server in the database mirror – SQL1. In the Connection parameters, for the Server name, type the entire SQL Instance Name. For me, it was SQL1\PRINCIPAL. Select OK.

3) Start the User Profile Synchronization Service again.

Walla! It starts correctly now!


Hope this helps.

Wednesday, July 21, 2010

‘Deployment Status: Error’ when deploying solution (.wsp) to SharePoint farm

Quick Tip: When deploying a solution file to your SharePoint farm, if within 5 seconds you encounter an Error for deployment status (In Central Administration, under Operations, Solution Management) with no additional details, ensure the Windows SharePoint Services Administration service is started on all SharePoint servers in the farm. Also, ensure the service is running as the Local System account on each server.

Hope this quick tip saves you hours of troubleshooting!

Tuesday, June 1, 2010

SharePoint 2010 Edition Comparison

It's been a while since I last posted (has it really been over a year?!). So with the recent release of SharePoint 2010, I should have some good stuff posted over the next six months. Particularly, I have a few SharePoint 2010 deployments on my schedule and will be posting lessons learned from each project upon completion. In the meantime, Microsoft has a nice SharePoint 2010 Edition Comparison site now available. As you will see, SharePoint Foundation has some powerful functionality for a free product:

http://sharepoint.microsoft.com/en-us/buy/pages/editions-comparison.aspx