Ever had a need to backup or migrate the content (libraries, lists, etc.) of a subsite in SharePoint? The STSADM command-line tool makes it very easy. As you know, STSADM can be used to backup a site collection at the parent level by using the backup operation. However, there may be times in which you want to backup a subsite, either before patching your SharePoint farm or in efforts of migrating the subsite to another farm or web application. You can accomplish this task by using the export and import operations of STSADM. The following is an example of exporting the contents from a team subsite:
stsadm -o export -url http://portal/sites/hr/team -filename C:\SharePointBackups\hrteam.cmp -includeusersecurity
The includeusersecurity parameter preserves the user security settings.
To migrate this data to another farm or web application, you issue the import operation, as follows:
stsadm -o import -url http://portal2/sites/hr/team -filename
C:\SharePointBackups\hrteam.cmp -includeusersecurity
NOTE 1: When importing to a new SharePoint farm, the new farm must be at the same patch level as the old farm. Also, you may encounter an error stating that one or more features are not available in the new farm, but exist in old farm. In my case, I got the error "Could not find Feature S2SiteAdmin". To fix this issue, follow these three simple steps:
1. Copy the appropriate feature directory from the old farm to the new farm. The feature directories are located in C:\Program Files\Common Files\Microsoft Shared\Web Server Extensions\12\TEMPLATE\FEATURES. In my case, I copied the S2SiteAdmin directory from the old farm to the new farm.
2. Install the feature on the new farm by using the installfeature STSADM operation and the relative path to the Feature.xml file in your particular feature directory. In my case, I ran the following command:
stsadm -o installfeature -filename S2SiteAdmin\Feature.xml -name S2SiteAdmin
3. Activate the feature on the new farm by using the activatefeature STSADM operation. In my case, I ran the following command:
Stsadm -o activatefeature -name S2SiteAdmin -url http://portal2/sites/hr/team
NOTE 2: You must pre-create the subsite in the new environment before attempting to import to it. Also, the newly created subsite must use at least the same site template as the subsite to be imported, though I recommend using the Blank Site template to ensure the import runs without any issues.
The export and import STSADM operations are particularly useful if you administer project workspaces or subsites of a PWA (Project Web Access) site and need a good backup of their associated content before installing updates to the SharePoint farm. The PWA site is easy to recover by using the existing databases related to Project Server (Archive, Draft, Published, Reporting), but any project workspaces or subsites of the PWA site may require recovery using the import operation detailed in this blog post.
Wednesday, April 22, 2009
Thursday, April 2, 2009
Multiple Web Applications on Port 80
I have recently gotten a few questions (from SharePoint beginners) on how to run more than one SharePoint web application on port 80. Since there doesn’t seem to be a definitive set of instructions addressing this need, I thought I would “fill the void” in this blog post. In short, it’s all about using Host Headers! Now on to the detailed instructions...
Let’s assume you already have an existing web application (and associated site collections) using port 80. To add a new web application that also uses port 80, follow these three simple steps:
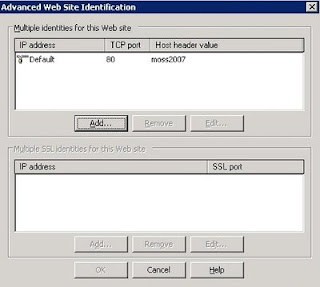
1. Ensure your existing web application has a host header. Open the Internet Information Services (IIS) Manager. Expand the Web Sites folder, right-click your existing web site, and select Properties. On the Web Site tab, select the Advanced button located in the Web site identification section. Highlight your web site entry and select to Edit. For the Host Header value, enter the name of your site URL without the http://. For example, if your site URL is http://portal, you would enter portal for the Host Header value. The screenshot below shows the Host Header value for a site URL named http://moss2007.
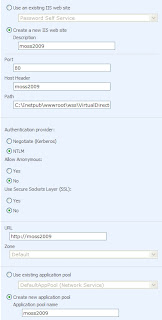
2. Create the new web application. In the Central Administration console, under Application Management, select Create or extend Web application, then Create a new Web application. Be sure to add the appropriate Host Header value, as shown in the screenshot below.
3. Ensure you have the appropriate Host (A) records in DNS for each of the Host Header values in your situation. Each Host (A) record must point to the IP address of the front-end web server or load balancer in your farm, as illustrated in the screenshot below.

All done!
Let’s assume you already have an existing web application (and associated site collections) using port 80. To add a new web application that also uses port 80, follow these three simple steps:
1. Ensure your existing web application has a host header. Open the Internet Information Services (IIS) Manager. Expand the Web Sites folder, right-click your existing web site, and select Properties. On the Web Site tab, select the Advanced button located in the Web site identification section. Highlight your web site entry and select to Edit. For the Host Header value, enter the name of your site URL without the http://. For example, if your site URL is http://portal, you would enter portal for the Host Header value. The screenshot below shows the Host Header value for a site URL named http://moss2007.

2. Create the new web application. In the Central Administration console, under Application Management, select Create or extend Web application, then Create a new Web application. Be sure to add the appropriate Host Header value, as shown in the screenshot below.

3. Ensure you have the appropriate Host (A) records in DNS for each of the Host Header values in your situation. Each Host (A) record must point to the IP address of the front-end web server or load balancer in your farm, as illustrated in the screenshot below.

All done!
Subscribe to:
Posts (Atom)