Yesterday evening, when installing Service Pack 2 to my test SharePoint farm, the configuration wizard failed on Step 3. After dissecting the Upgrade.log file located at C:\Program Files\Common Files\Microsoft Shared\Web Server Extensions\12\Logs\Upgrade.log, I found the following error:
[WebApplicationSequence] [ERROR] [5/10/2009 6:51:13 PM]: Feature '20477d83-8bdb-414e-964b-080637f7d99b' is not installed in this farm, and cannot be added to this scope.
After further research, I discovered the feature referred to in the error (20477d83-8bdb-414e-964b-080637f7d99b) is the “PublishingTimerJobs” feature. To install this feature to the farm, run the following stsadm command:
stsadm -o installfeature -name PublishingTimerJobs
Next, I recommend forcing the timer job to execute immediately.
stsadm.exe -o execadmsvcjobs
Finally, run the configuration wizard again to successfully complete the installation of SP2 to the SharePoint farm:
psconfig -cmd upgrade -wait -inplace b2b
Hope this helps.
Monday, May 11, 2009
Wednesday, April 22, 2009
Exporting and Importing Subsites
Ever had a need to backup or migrate the content (libraries, lists, etc.) of a subsite in SharePoint? The STSADM command-line tool makes it very easy. As you know, STSADM can be used to backup a site collection at the parent level by using the backup operation. However, there may be times in which you want to backup a subsite, either before patching your SharePoint farm or in efforts of migrating the subsite to another farm or web application. You can accomplish this task by using the export and import operations of STSADM. The following is an example of exporting the contents from a team subsite:
stsadm -o export -url http://portal/sites/hr/team -filename C:\SharePointBackups\hrteam.cmp -includeusersecurity
The includeusersecurity parameter preserves the user security settings.
To migrate this data to another farm or web application, you issue the import operation, as follows:
stsadm -o import -url http://portal2/sites/hr/team -filename
C:\SharePointBackups\hrteam.cmp -includeusersecurity
NOTE 1: When importing to a new SharePoint farm, the new farm must be at the same patch level as the old farm. Also, you may encounter an error stating that one or more features are not available in the new farm, but exist in old farm. In my case, I got the error "Could not find Feature S2SiteAdmin". To fix this issue, follow these three simple steps:
1. Copy the appropriate feature directory from the old farm to the new farm. The feature directories are located in C:\Program Files\Common Files\Microsoft Shared\Web Server Extensions\12\TEMPLATE\FEATURES. In my case, I copied the S2SiteAdmin directory from the old farm to the new farm.
2. Install the feature on the new farm by using the installfeature STSADM operation and the relative path to the Feature.xml file in your particular feature directory. In my case, I ran the following command:
stsadm -o installfeature -filename S2SiteAdmin\Feature.xml -name S2SiteAdmin
3. Activate the feature on the new farm by using the activatefeature STSADM operation. In my case, I ran the following command:
Stsadm -o activatefeature -name S2SiteAdmin -url http://portal2/sites/hr/team
NOTE 2: You must pre-create the subsite in the new environment before attempting to import to it. Also, the newly created subsite must use at least the same site template as the subsite to be imported, though I recommend using the Blank Site template to ensure the import runs without any issues.
The export and import STSADM operations are particularly useful if you administer project workspaces or subsites of a PWA (Project Web Access) site and need a good backup of their associated content before installing updates to the SharePoint farm. The PWA site is easy to recover by using the existing databases related to Project Server (Archive, Draft, Published, Reporting), but any project workspaces or subsites of the PWA site may require recovery using the import operation detailed in this blog post.
Thursday, April 2, 2009
Multiple Web Applications on Port 80
I have recently gotten a few questions (from SharePoint beginners) on how to run more than one SharePoint web application on port 80. Since there doesn’t seem to be a definitive set of instructions addressing this need, I thought I would “fill the void” in this blog post. In short, it’s all about using Host Headers! Now on to the detailed instructions...
Let’s assume you already have an existing web application (and associated site collections) using port 80. To add a new web application that also uses port 80, follow these three simple steps:
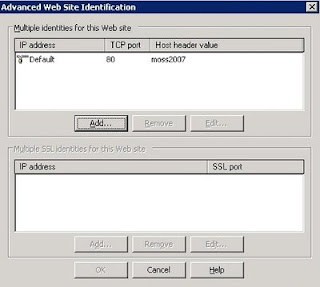
1. Ensure your existing web application has a host header. Open the Internet Information Services (IIS) Manager. Expand the Web Sites folder, right-click your existing web site, and select Properties. On the Web Site tab, select the Advanced button located in the Web site identification section. Highlight your web site entry and select to Edit. For the Host Header value, enter the name of your site URL without the http://. For example, if your site URL is http://portal, you would enter portal for the Host Header value. The screenshot below shows the Host Header value for a site URL named http://moss2007.
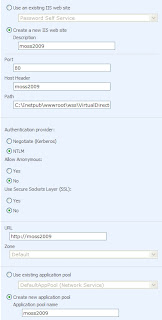
2. Create the new web application. In the Central Administration console, under Application Management, select Create or extend Web application, then Create a new Web application. Be sure to add the appropriate Host Header value, as shown in the screenshot below.
3. Ensure you have the appropriate Host (A) records in DNS for each of the Host Header values in your situation. Each Host (A) record must point to the IP address of the front-end web server or load balancer in your farm, as illustrated in the screenshot below.

All done!
Let’s assume you already have an existing web application (and associated site collections) using port 80. To add a new web application that also uses port 80, follow these three simple steps:
1. Ensure your existing web application has a host header. Open the Internet Information Services (IIS) Manager. Expand the Web Sites folder, right-click your existing web site, and select Properties. On the Web Site tab, select the Advanced button located in the Web site identification section. Highlight your web site entry and select to Edit. For the Host Header value, enter the name of your site URL without the http://. For example, if your site URL is http://portal, you would enter portal for the Host Header value. The screenshot below shows the Host Header value for a site URL named http://moss2007.

2. Create the new web application. In the Central Administration console, under Application Management, select Create or extend Web application, then Create a new Web application. Be sure to add the appropriate Host Header value, as shown in the screenshot below.

3. Ensure you have the appropriate Host (A) records in DNS for each of the Host Header values in your situation. Each Host (A) record must point to the IP address of the front-end web server or load balancer in your farm, as illustrated in the screenshot below.

All done!
Monday, March 23, 2009
Hide default system libraries on Publishing Site
When you create a publishing site, the publishing feature in SharePoint automatically creates three document (system) libraries: Documents, Images, and Pages.
The Documents system library is used to store documents that are attached to or related to publishing pages. The Images system library is used to store graphics and photos that are attached or related to publishing pages. The Pages system library is where pages that were created in the browser are stored.
To eliminate confusion with any user-created document libaries, you can hide these system libraries by following these simple steps:
1. Open your publishing site in Office SharePoint Designer 2007.
2. Right-click on each system library you want to hide and select Properties.
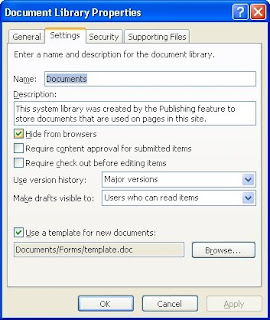
3. On the Settings tab, select to Hide from browsers.
4. Select OK.
Each system library is now hidden from browser view.

The Documents system library is used to store documents that are attached to or related to publishing pages. The Images system library is used to store graphics and photos that are attached or related to publishing pages. The Pages system library is where pages that were created in the browser are stored.
To eliminate confusion with any user-created document libaries, you can hide these system libraries by following these simple steps:
1. Open your publishing site in Office SharePoint Designer 2007.
2. Right-click on each system library you want to hide and select Properties.
3. On the Settings tab, select to Hide from browsers.
4. Select OK.

Each system library is now hidden from browser view.
Tuesday, March 10, 2009
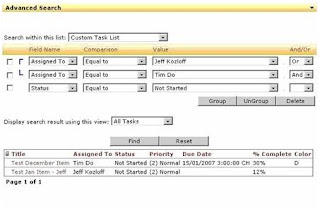
Advanced Search Web Part for SharePoint Lists
Recently, the Business Analysis manager at my current workplace requested the ability to search custom columns on individual lists (Project Tasks lists in particular) on a SharePoint site. Initially, I thought I could use the Advanced Search Box web part available out-of-the-box in SharePoint. I am already familiar with the document content search capabilities using metadata properties and the Advanced Search Box web part, but this approach is primarily used in searching for specific documents and files at the site collection level or within search scopes. Moreover, I discovered other complexities associated with the requested lists. For instance, some of the default list columns had been renamed instead of creating custom columns for unique information. Further research and Google searches returned nothing tangible, so I realized a custom web part was needed.
I don’t claim to be a true “SharePoint Developer”, but I can roll up the sleeves and dish out some .NET code when absolutely necessary. More importantly, I know WHEN the development of a custom web part is needed, and in my experiences it is pretty rare. For those that know EVERYTHING available in SharePoint out-of-the-box, you know what I am talking about. So, before taking the development route, I decided to take a quick look at Bamboo Solutions. Sure enough, they have exactly what I needed in their List Search Advanced Web Part. For a mere $300, you can deploy this cool web part and make it available throughout your entire SharePoint farm. Now that’s what I call efficiency!
With the List Search Advanced Web Part, you can:
- Limit searches to a single list without the need to create an index and search scope.
- Display search results by individual list item.
- Customize views to define the display of the search results list, including columns, sorts, and groups.
- Include AND / OR operators in the search criteria, and the ability to group the criteria.
- Allow printing of the search results.
- Require users to type in text when a Lookup field is selected instead of hindering web part performance by selecting from a drop-down list that has too much data.

Ok, so that’s two consecutive blog posts regarding Bamboo products. Before you ask, the answer is no -- I do not work for Bamboo Solutions nor do I receive any royalty from them. I simply believe in taking advantage of opportunities to be more efficient, particularly in regards to custom development. Of course, the quality must be there too, and Bamboo offers some of the best products on the market.
I promise my next blog post will not be about a product from Bamboo Solutions…
Thursday, February 26, 2009
Bamboo SharePoint Analyzer
Bamboo Solutions, the leading provider of SharePoint Web Parts and technologies that extend the functionality of the SharePoint platform, has established a Bamboo Labs site where they give you the opportunity to try new products and technologies in development at Bamboo before they're available for purchase. One of their latest beta products, called SharePoint Analyzer, is a tool that administrators can use to quickly discover the configuration details of any SharePoint deployment. Specifically, SharePoint Analyzer will return the following information:
- The entire farm topology, from Web applications all the way down to individual lists.
- Server information, including patches and updates.
- Information on databases that are being used as part of your SharePoint deployment.
- Solutions and Features that have been deployed, displayed per Web Application, Site Collection, or Site scope.
- Services and their status.
- Information about Bamboo products that are used in your farm.
I have installed and evaluated SharePoint Analyzer, and it is indeed a great tool. Not surprised though, Bamboo has been introducing great SharePoint products for over five years now, and I suspect it will only get better. As in their words, “If you have SharePoint, you need Bamboo!”
Monday, February 23, 2009
The Ideal Manager
In this post, I thought I would discuss some of the characteristics of what I believe make up an ideal manager. In other words, how I like to be managed. I realize this blog post might be off-topic, but I believe we all should take advantage of opportunities to convey thoughts that could potentially make a positive difference in people’s lives, both personally and professionally.
As a former manager who has spent the better part of last five years overseeing the entire operations of an IT department for a company consisting of over 700 employees, I have spent an equal amount of time studying and applying the philosophies of many respected leaders throughout the industry. Much of my learning can be credited to Ramon Padilla, a well-known author on the popular TechRepublic website. Ramon’s experience includes 16+ years in IT management, with 10+ of those years being in senior IT management. His articles target managers on all levels, so I highly recommend Ramon’s advice whether you are a newly appointed front-line manager or a seasoned veteran in a CIO or CTO position.
So, without further ado, and in no particular order, my ideal manager is someone who:
- Believes in developing their people. I believe that lifelong learning and continuous improvement through training and education is what prevents a department from going stagnant or mediocre. The IT field is constantly changing, and many IT professionals actually enjoy learning about new and improving technologies. The ideal manager knows how to budget for training and development, and encourages staff to attend industry events whenever possible.
- Gets to know and understand their people’s work style, and aligns people according to their strengths. Every person is different, from their skill set to the way they prefer to work on activities. The “across the board” management approach simply does not cut it today’s workforce. The ideal manager gets to know the strengths and weaknesses of each person on the team, and works to leverage and build upon those strengths while minimizing efforts to improve each person’s weaknesses. In most cases, a person’s weaknesses are chosen by them, either because they are not interested in learning a particular skill or technology, or they simply do not believe it benefits their long-term career goals.
- Knows how to delegate appropriately. I believe one of the common mistakes managers make is trying to perform most of the technical duties of a department by themselves. Staff members need to know that they can be trusted with certain tasks, and managers should recognize that delegation is important to the overall health of the department. The ideal manager knows how and what to delegate as well as how to demonstrate the patience needed to see each delegated task through its completion.
- Focuses on overall productivity, not the time clock. The ideal manager sets clear goals and objectives that generally take staff 40 hours per week (or longer) to accomplish, then lets the staff manage their own time. As long as each employee is in attendance for important meetings and is available during the team’s general working hours, he or she should be empowered to work at whatever pace they believe they can be more productive. Again, employees need to know they are trusted and held accountable for their assignments.
- Knows the business and how each person on the team affects it. The ideal manager understands the business segments he or she supports and ensures that each team member also understands how their work affects the overall goals of those business segments. Furthermore, the ideal manager believes every project is essentially a business project with an IT component.
- Understands communication is a two-way responsibility. Communication should flow freely and easily between managers and staff. Every member of the team should be given the opportunity to discuss their ideas, and managers should spend as much time listening and asking questions as they do giving overall direction.
- Encourages teamwork. There is no individual more important than the team. The ideal manager establishes a collaborative and team-oriented environment that leads to a diverse, cross-functional staff. Generally, one team member knows the answer to something that another team member has wasted valuable hours trying to resolve. Teamwork also inherently improves communication within the department.
- Provides continual feedback while being direct and to the point. The ideal manager ensures that each team member knows what they are doing well and what they are doing not so well. Through methods that include casual conversations, formal performance reviews, and employee recognition events, managers should be clear and direct when assigning tasks and providing feedback for a finished assignment or project.
- Believes work should be fun. Should work be considered fun? Absolutely. Employees spend far too much time at the workplace not to find a way to enjoy it. Besides, who wants to work for a leader that is down all the time? The ideal manager has a passion for what he or she does, and uses that passion to permeate their entire department with inspiration. I personally approach each and every day on the job as an opportunity to make a difference in the organization. By solving business problems and improving business processes using SharePoint technologies, I live out my passion. If I’m living out my passion, I’m having fun.
- Knows how to hire well. As the old saying goes, “One bad apple can spoil the bunch”. The ideal manager understands that both technical and organizational skills should be evaluated when hiring a new member to the team. Some managers take it a step further and get the team involved in the hiring process.
- Believes in some form of the seven Ps, in regards to planning. Not really, but he or she should take planning seriously. For me, it’s “Proper Prior Planning Prevents Piss-Poor Performance”.
- Believes responsible, professional people can be as productive working from home as they are in the office. The idea of staff working from home continues to rub some managers the wrong way, and the topic of telecommuting is very touchy in some organizations. I personally believe it’s primarily due to the lack of structure, policies, and just plain old fashion management styles in some organizations. My experiences with telecommuting have all been very positive. In fact, I actually seen an increase in overall productivity after establishing a “work at home” initiative at my former workplace.
- Cherishes honesty. This is a biggie for me. In my opinion, the quickest way to lose respect of staff is to lie to them. Honesty enhances trust, and if employees know you tell the truth, they will trust your words and actions more. Obviously, there are going to be some things that are deemed confidential that only managers are allowed to know, but there are other ways of communicating such things to the team without flat-out lying to them.
- Establishes a level of expectation. In other words, no surprises. One of the first things I like to do when taking a new job is sit down with my new manager and discuss our expectations for each other. Common questions I ask the manager include “What can I expect for good performance?”, “What about bad performance?”, and “What is your management style?” Furthermore, whenever possible, managers should always keep staff in the loop of any upcoming change and provide the reasoning for it. They will appreciate you keeping them informed.
Thursday, February 12, 2009
"Access is denied. Check that the Default Content Access Account has access to this content, or add a crawl rule to crawl this content"
Recently, in my testing environment, I encountered the following error in the crawl log: "Access is denied. Check that the Default Content Access Account has access to this content, or add a crawl rule to crawl this content". After verifying the search content service account had all the necessary permissions to access the data for indexing, I was stumped. Then I found the following article issued by Microsoft:
http://support.microsoft.com/default.aspx/kb/896861
According to the article, Windows Server 2003 SP1 includes a loopback check security feature that is designed to help prevent reflection attacks on your server. Therefore, authentication fails if the FQDN or custom host header that you use does not match the local server name.
Since my testing environment is running Windows Server 2003 SP2 and uses different host headers for different web applications in IIS 6.0, I experienced this symptom. I applied the Method 1 workaround offered in the article and was then successful in crawling content.
Note: You only receive this error message if you try to browse the Web site directly on the server. If you browse the Web site from a client computer, the Web site works as expected.
Friday, January 30, 2009
The Ultimate MOSS 2007 Deployment Guide
If you need help in planning and managing each stage of a Microsoft Office SharePoint Server 2007 deployment, Microsoft TechNet has made available a white paper that contains a sample deployment plan and several checklists that guide you through planning the following aspects:
- Information architecture
- Development and configuration policies
- Ongoing operations
- Infrastructure
Download: Office SharePoint Server 2007 Deployment Guide and Checklists (White Paper)
- Information architecture
- Development and configuration policies
- Ongoing operations
- Infrastructure
Download: Office SharePoint Server 2007 Deployment Guide and Checklists (White Paper)
Friday, January 23, 2009
SharePoint End User Training
So I finally got around to installing and configuring the SharePoint Training Kit solution for the end users in my organization, and let me tell you -- they LOVE IT! If you manage a SharePoint farm with lots of users, I highly recommend deploying this solution. The built-in training modules use videos, interactive tutorials, and articles that provide step-by-step instructions on how to use some of the common features of SharePoint.
Thursday, January 15, 2009
Properly deploy software updates to a MOSS 2007 farm: Part 2
UPGRADE PHASE
1. Backup the farm again. Refer to Step 4 of my previous “PRE-UPGRADE” post.
2. On each server in the farm, rename the Upgrade.log file located in Program Files\Common Files\Microsoft Shared\Web Server Extensions\12\LOGS. The Upgrade.log file holds a cumulative history of update activity for that given server. Renaming the existing Upgrade.log file allows a new, clean version of the file to be created during the upgrade process. This makes troubleshooting easier if the upgrade process fails.
3. Disable antivirus software.
4. Stop the WWW service on all front-end web servers in the farm.
5. If your content databases are larger than 25 GB, you should prepare to move them, and then detach them. This will minimize the downtime required to upgrade. See below for instructions.
To prepare to move the content databases, run the following command line:
stsadm -o preparetomove -contentdb YourSQLServerName:YourDatabaseName -site http://YourSiteURL
To detach the content databases, run the following command line:
stsadm -o deletecontentdb -url http://YourSiteURL -databaseserver YourSQLServerName -databasename YourDatabaseName
6. Determine the server upgrade sequence. Microsoft recommends that you first upgrade the server that is hosting the Central Administration Web Site (application server or front-end web), then the application servers, and finally the front-end web servers.
7. Logged in as the Setup account, run the appropriate installation packages on each server according to the upgrade sequence above in Step 6 and the update installation sequence in Step 2 of my previous “PRE-UPGRADE” post. Be sure to cancel the SharePoint Configuration Wizard each time it appears after running an update package on each server. You have now installed the necessary binaries on each server.
8. On the first server in which you ran the updates, complete the upgrade process by running psconfig –cmd upgrade –inplace b2b at a command prompt. After the operation completes, verify the upgrade was successful by viewing the Upgrade.log file.
9. Complete the upgrade process on all other servers in the farm by running psconfig –cmd upgrade –inplace b2b on all other servers in the farm. Be sure to follow the same sequential order as described in Step 6. Verify each server was successfully upgraded by viewing their respective Upgrade.log file.
10. If you detached any content databases as described in Step 5, re-attach each database one-by-one. Each database will be automatically upgraded when it is attached. To attach a content database, run the following command line:
stsadm -o addcontentdb -url http://YourSiteURL -databasename YourDatabaseName -databaseserver YourDatabaseServerName
11. If needed, install language pack updates for both WSS and MOSS.
12. Enable antivirus software.
13. Start the WWW service on all front-end web servers.
14. On the Central Administration Web Site, check the version number for each server (Operations tab, Servers in Farm). They should all be the same updated version.
15. Perform a backup of the farm. As mentioned in Step 4 of my “PRE-UPGRADE” post, the previous backups are no longer valid. You need a backup of the upgraded environment.
16. Perform a full crawl of all MOSS content.
Remember to view the Upgrade.log files if you experience issues during the upgrade process.
Wednesday, January 14, 2009
Properly deploy software updates to a MOSS 2007 farm: Part 1
With the recent release of the December Cumulative Update, many of you may be confused on how to properly deploy software updates to a MOSS 2007 farm. I have put together a complete step-by-step overview of the deployment process. Because it contains two separate phases (PRE-UPGRADE PHASE and UPGRADE PHASE), I have decided to convey the necessary information in two separate blog posts. This first post will discuss each step of the pre-upgrade phase.
PRE-UPGRADE PHASE
1. Ensure each Windows Server 2003 server in the MOSS farm is up-to-date with the latest operating system service pack and other critical updates. Use Windows Update if needed.
2. Determine and download the updates you need to install and the sequence by which you will install each update. For an updated list of the major updates available for MOSS 2007, refer to the Deploy software updates for Office SharePoint Server 2007 guide located at http://technet.microsoft.com/en-us/library/cc263467. To view what updates you currently have installed on your MOSS farm, simply open Add or Remove Programs and check the Show updates option. In regards to an update installation sequence, Microsoft recommends installing updates in the following sequence:
a. Windows SharePoint Services 3.0 Service Pack 1 (KB 936988)
b. The 2007 Microsoft Office Servers Service Pack 1 (KB 936984)
c. The Windows SharePoint Services 3.0 December Cumulative Update (KB 960010)
d. The Microsoft Office Servers December Cumulative Update (KB 960011)
NOTE: Microsoft has announced that beginning with the December Cumulative Update all subsequent Cumulative Updates will also contain a package that includes the latest version of every hotfix patch available to date. Therefore, when building a new MOSS server, you can simply apply the latest service pack, the latest WSS Cumulative Update package, and finally the latest MOSS Cumulative Update package and be completely up-to-date.
3. Ensure the system drive on each server in the farm has enough disk space to accommodate the new updates. At minimum, there should be at least 1 GB available on the system drive of each server, but I recommend a system drive of 6 GB or greater per server. This is especially true for 64-bit systems as they generally need larger partitions.
4. Backup the farm and verify restore capabilities. THIS IS A VERY IMPORTANT STEP. Why? Because if something goes wrong during the upgrade process, you will need the capability of restoring the farm back to its pre-upgrade status. Here’s another tidbit -- once you upgrade an existing farm, you cannot restore the farm to its previous state. In other words, you cannot restore an older version of a farm to a newer version. For example, if you apply Service Pack 1 (SP1) to a MOSS farm, backups of the pre-SP1 farm are no longer valid for restore. So how do you restore to a previous version of the farm? You would have to build a new MOSS farm to the same update level as your backup, and then restore the farm from your backup to the newly built farm. I know, it sucks, but we must deal with it.
NOTE: If you are using the “out-of-the-box” backup capabilities in MOSS 2007, such as the farm backup feature available in the Operations tab of the Central Administration Web Site, be sure to also manually backup the following:
a. Any configuration changes or custom solution files in the Inetpub or Office 12 hive (Program Files\Common Files\Microsoft Shared\Web server extensions\12).
b. Any customizations made to the Web.config file.
c. Alternate access mappings.
d. Internet Information Services (IIS) settings, including host headers, dedicated IP addresses, and Secure Sockets Layer (SSL) certificates.
e. Any other out-of-the-box files you have customized.
5. Document the content databases by running stsadm –o enumcontentdbs –url http://yourwebappURL at a command prompt. If you need to reconnect them later, you will have the necessary information readily available.
6. Check the size of the content databases. Best practice recommends a maximum size of 100 GB for each content database. If you have content databases that exceed 100 GB, I recommend adding more content databases and load balancing the site collections as needed.
7. Ensure there are no orphans in the farm. To detect orphaned items, use the following command line: stsadm –o databaserepair –url http://yoursiteURL –databasename YourDatabaseName. To delete orphaned items, use the following command line: stsadm –o databaserepair –url http://yoursiteURL –databasename YourDatabaseName –deletecorruption.
8. Check the logical and physical integrity of all objects in the MOSS databases by performing a DBCC CHECKDB on each database. For more information on how to use this procedure, see the following link: http://msdn.microsoft.com/en-us/library/ms176064.aspx.
9. Defragment the content, search, and profile databases as needed. Refer to the following link for an SQL script that measures the level of fragmentation for each database, and then performs either an offline defragmentation or online defragmentation if it is required. http://support.microsoft.com/kb/943345
10. Check the status of Timer Jobs. If you upgraded from a previous version of SharePoint, either in-place or gradual, there could be some upgrade jobs still in progress. If so, the software update installation might fail. Verify that none of the upgrade processes are running.
My next post will cover the upgrade phase. Stay tuned…
Monday, January 12, 2009
Now Available: Adobe PDF iFilter 9 for 64-bit platforms
I just recently discovered that Adobe has introduced a PDF iFilter 9 for 64-bit SharePoint farms. I have not installed and tested it yet, but I certainly will before I shell out the money for Foxit's licensed version. Please post comments if you have any experience with this new iFilter.
http://www.adobe.com/support/downloads/detail.jsp?ftpID=4025
http://www.adobe.com/support/downloads/detail.jsp?ftpID=4025
Friday, January 9, 2009
Moving My Sites to a separate content database and web application
So, you have performed an in-place or gradual upgrade to MOSS 2007 and your My Sites exist on the same content database and web application as your main portal. See below for the steps to move your My Sites to a separate content database and web application.
These same steps also apply to those who simply have a need to move My Sites to a separate content database and web application.
NOTE: Service Pack 1 for MOSS 2007 must be installed before performing the following steps.
1. Create a new web application using either the Central Administration GUI or the STSADM command line tool. I recommend using the same easily identifiable name for the IIS Website and Application Pool, such as SharePoint - MySites. The associated content database will be removed in Step 4 below, so you can give it a name of WSS_Content_MySites.
2. Define managed paths for the web application created in Step 1. You only need two new paths -- an Explicit inclusion for mysite and a Wildcard inclusion for personal.
3. Create a new site collection on the web application created in Step 1. Give it an appropriate title, such as My Site Host. Be sure to use the /mysite path and choose the My Site Host template located under the Enterprise tab. After the site collection is created, click to visit the new My Site Host and click the button marked Set as My Site Host.
4. Remove the content database that was created for the web application created in Step 1. To do this, while in the Central Administration GUI, go to Application Management and click Content databases. Click the web application dropdown to select the web application created in Step 1. Click on the database that is listed (WSS_Content_MySites), place a check in the box next to Remove content database, and click OK.
5. Add a new content database to the main portal web application. In Application Management, click Content databases. Click the web application dropdown to select the main portal web application, then click Add a content database. This new database will be your My Sites database, so give it a more descriptive Database Name, such as MySites_Content. Click OK to add the new database.
6. At a command prompt, enumerate out all My Sites to an XML file by running the following command:
stsadm -o enumsites -url http://yourmainportal/personal > C:\MySites.xml
Wait for the command to finish, and do not close the command prompt.
Open the MySites.xml file with notepad and remove any site that is not a personal site, including the /mysite entry. Do not worry about the "Sites count" as the STSADM tool only sees the url paths. Save and close the MySites.xml file.
7. At the same command prompt, move the personal sites located in the MySites.xml file to the new Content Database by running the following command:
stsadm -o mergecontentdbs -url http://yourmainportal -sourcedatabasename mainportaldatabasename-destinationdatabasename databasefromStep5 -filename C:\MySites.xml -operation 3
Wait for the command to finish, and do not close the command prompt.
8. At the same command prompt, restart IIS by running the following command:
iis restart
Wait for the command to finish, and do not close the command prompt.
9. At the same command prompt, prepare to move the content database created in Step 5 by running the following command:
stsadm -o preparetomove -ContentDB DatabaseServer:DatabaseFromStep5
Wait for the command to finish, and do not close the command prompt.
10. Remove the content database created in Step 5 from the main portal web application by following the same sequence in Step 4.
11. At the same command prompt, add the content database created in Step 5 to the new My Site web application created in Step 1 by running the following command:
stsadm -o addcontentdb -url newmysiteurl-databasename databasefromStep5
Wait for the command to finish and close the command prompt (finally).
12. Confirm that the content database created in Step 5 is now associated with the new My Site web application created in Step 1.
These same steps also apply to those who simply have a need to move My Sites to a separate content database and web application.
NOTE: Service Pack 1 for MOSS 2007 must be installed before performing the following steps.
1. Create a new web application using either the Central Administration GUI or the STSADM command line tool. I recommend using the same easily identifiable name for the IIS Website and Application Pool, such as SharePoint - MySites. The associated content database will be removed in Step 4 below, so you can give it a name of WSS_Content_MySites.
2. Define managed paths for the web application created in Step 1. You only need two new paths -- an Explicit inclusion for mysite and a Wildcard inclusion for personal.
3. Create a new site collection on the web application created in Step 1. Give it an appropriate title, such as My Site Host. Be sure to use the /mysite path and choose the My Site Host template located under the Enterprise tab. After the site collection is created, click to visit the new My Site Host and click the button marked Set as My Site Host.
4. Remove the content database that was created for the web application created in Step 1. To do this, while in the Central Administration GUI, go to Application Management and click Content databases. Click the web application dropdown to select the web application created in Step 1. Click on the database that is listed (WSS_Content_MySites), place a check in the box next to Remove content database, and click OK.
5. Add a new content database to the main portal web application. In Application Management, click Content databases. Click the web application dropdown to select the main portal web application, then click Add a content database. This new database will be your My Sites database, so give it a more descriptive Database Name, such as MySites_Content. Click OK to add the new database.
6. At a command prompt, enumerate out all My Sites to an XML file by running the following command:
stsadm -o enumsites -url http://yourmainportal/personal > C:\MySites.xml
Wait for the command to finish, and do not close the command prompt.
Open the MySites.xml file with notepad and remove any site that is not a personal site, including the /mysite entry. Do not worry about the "Sites count" as the STSADM tool only sees the url paths. Save and close the MySites.xml file.
7. At the same command prompt, move the personal sites located in the MySites.xml file to the new Content Database by running the following command:
stsadm -o mergecontentdbs -url http://yourmainportal -sourcedatabasename mainportaldatabasename
Wait for the command to finish, and do not close the command prompt.
8. At the same command prompt, restart IIS by running the following command:
iis restart
Wait for the command to finish, and do not close the command prompt.
9. At the same command prompt, prepare to move the content database created in Step 5 by running the following command:
stsadm -o preparetomove -ContentDB DatabaseServer:DatabaseFromStep5
Wait for the command to finish, and do not close the command prompt.
10. Remove the content database created in Step 5 from the main portal web application by following the same sequence in Step 4.
11. At the same command prompt, add the content database created in Step 5 to the new My Site web application created in Step 1 by running the following command:
stsadm -o addcontentdb -url newmysiteurl
Wait for the command to finish and close the command prompt (finally).
12. Confirm that the content database created in Step 5 is now associated with the new My Site web application created in Step 1.
Subscribe to:
Posts (Atom)