Friday, August 17, 2012

SharePoint 2010 sites experience ‘An unexpected error has occurred’ upon connecting to a User Profile Service Application published from another farm

Issue

Upon establishing a User Profile Service Application Proxy connection to a User Profile Service Application published from another farm, your SharePoint 2010 sites crash with the dreaded unexpected error message:


Upon reviewing the ULS logs, you will notice there is also a login failed error related to the database associated with the User Profile Service Application on the publishing farm:

System.Data.SqlClient.SqlException: Cannot open database "" requested by the login. The login failed. Login failed for user ''.

SqlError: 'Login failed for user ''.' Source: '.Net SqlClient Data Provider' Number: 18456 State: 1 Class: 14 Procedure: '' LineNumber: 65536 Server: ','


I have noticed this issue occurs primarily when using SQL aliasing.

Solution

1)      Create a SQL alias on the consuming farm that matches the alias on the publishing farm. For example, if you have an alias name of SQLDev on the publishing farm, create an alias with the name of SQLDev on the consuming farm, both pointing to database server for the publishing farm.

2)      Restart IIS on each server in the consuming farm. iisreset /noforce.

3)      Restart the Timer service on each server in the consuming farm. net stop sptimerv4 and net start sptimerv4.

Thursday, July 5, 2012

PowerShell: Enumerate and Export User Profiles and Properties in SharePoint 2010

Good stuff for this latest blog post from me.

I recently had a request to validate the value of a particular set of properties for all user profiles in SharePoint 2010. PowerShell to the rescue! Save the following script to a .ps1 file.

[void][System.Reflection.Assembly]::LoadWithPartialName("Microsoft.Office.Server")
[void][System.Reflection.Assembly]::LoadWithPartialName("Microsoft.Office.Server.UserProfiles")
[void][System.Reflection.Assembly]::LoadWithPartialName("Microsoft.SharePoint")

# SharePoint site URL
$site = new-object Microsoft.SharePoint.SPSite("http://site"); 

$ServiceContext = [Microsoft.SharePoint.SPServiceContext]::GetContext($site);   

$ProfileManager = new-object Microsoft.Office.Server.UserProfiles.UserProfileManager($ServiceContext)

$AllProfiles = $ProfileManager.GetEnumerator()

write-output "Display Name; AccountName; Supervisor"

foreach($profile in $AllProfiles)
{
$DisplayName = $profile.DisplayName
$AccountName = $profile[[Microsoft.Office.Server.UserProfiles.PropertyConstants]::AccountName].Value
$Supervisor = $profile["Supervisor"].value
write-output "$($DisplayName); $($AccountName); $($Supervisor)"
}

write-output "Finished."

$site.Dispose()


In my example above, I am getting the value for three properties: Display Name, Account Name, and Supervisor.

For the list of PropertyConstants members, see the following link:

http://msdn.microsoft.com/en-us/library/microsoft.office.server.userprofiles.propertyconstants_members.aspx

Export the output of this script to a CSV file by appending > filename.csv to the command. Therefore, the entire PowerShell command would be:

.\filename.ps1 > filename.csv

Thursday, May 3, 2012

Filter Announcements List by Month in SharePoint

To filter an announcements list by month on a MOSS 2007 or SharePoint 2010 site, I like to create a new calculated column based on the Created column in the list, and then create filtered views for each month.

1) Create a new calcluated column named Month, and use the following formula:

=TEXT(Created,"yyyy - ")&TEXT(Created,"mm")&TEXT(Created," (mmmm")&TEXT(Created," yyyy)")


The resulting column output will look like this: 2012 - 05 (May 2012)

2) Create a new view for each month.

On the list, go to Settings, Create View, Standard View. Give it a name. Configure your filter options as shown here:


All done.

Tuesday, April 17, 2012

User Profile Service Redundancy in SharePoint 2010

For those looking to implement load balancing of the User Profile Service on two application servers within the same SharePoint 2010 farm, while providing failover in case one server goes down or needs to go offline, it’s a fairly easy thing to configure. Simply start the User Profile Service on a second application server in the farm. If the first application server goes down, or if you manually stop the User Profile Service on the first application server, the second application server will assume hosting operations for the User Profile Service. The User Profile Synchronization Service, however, can only be started on one application server within a farm at any given time. Therefore, in the case of a failover to the second application server, the User Profile Synchronization Service must be manually started on the second application server to continue profile synchronization. No biggie really.

Wednesday, April 4, 2012

"Excel Services is unable to process the request. Wait a few minutes and try performing this operation again."

On a SharePoint 2010 site, when attempting to open Excel files with a .xlsx or .xlsm extension, you receive the following error message:


You will also notice that legacy Excel files with a .xls extension open just fine.

Resolution

1. Ensure you have an Excel Services service application established.
2. Ensure that your web application is associated with the Excel Services service application. In Central Administration, go to Application Management, Configure service applications associations. Ensure Web Applications is selected from the View drop-down menu. Click on the appropriate Application Proxy Group (more than likely default), ensure the Excel Services service application is checked, and select OK.

Friday, January 20, 2012

Configure Windows Server 2008 SMTP for Outgoing Email in SharePoint

For those who need outgoing email for SharePoint but do not have access to an SMTP server, you can configure the SMTP Server feature in Windows Server 2008 to use Gmail as an SMTP smart host to accomplish this need. The Gmail smart host is required because most modern email systems will not accept messages from a sending host that does not have proper MX and PTR records established.

Outline of steps to be completed:

1. Create a Gmail account and enable POP. You can use your existing Gmail account.
2. Add the SMTP Server feature to Windows Server 2008.
3. Configure SMTP settings in IIS 6.0.
4. Configure outgoing email settings in SharePoint.

Details of each step:

1. If you don’t already have a Gmail account, create one. After logging in to your account, go to the Options icon at the top right and select Mail settings. Select the Forwarding and POP/IMAP menu item. Select to “Enable POP for mail that arrives from now on”.

2. Add the SMTP Server feature to Windows Server 2008.

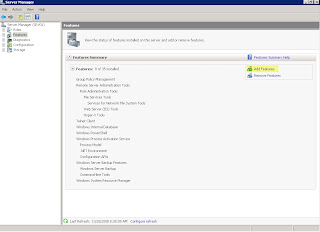
In Server Manager, select Features, and the Add Features link.


Select the SMTP Server feature and click Next.
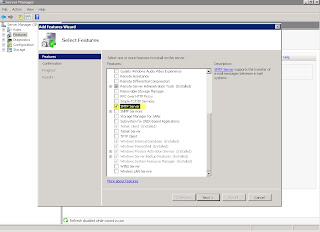


Click Install and wait until finished. Click Close when installation is complete. Exit Server Manager.

3. Configure SMTP settings in IIS 6.0.

Open IIS 6.0 Manager under Administrative Tools, Internet Information Services (IIS) 6.0 Manager.

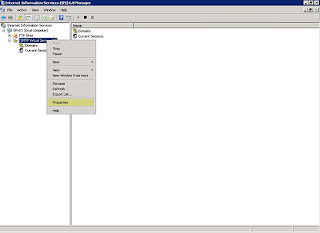
Right-click the SMTP Virtual Server instance and select Properties.


On the Access tab, select the Relay button.
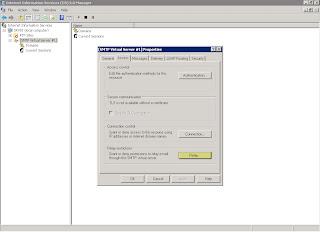


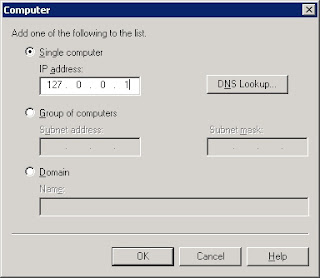
Ensure “Only the list below” is selected, and click the Add button.

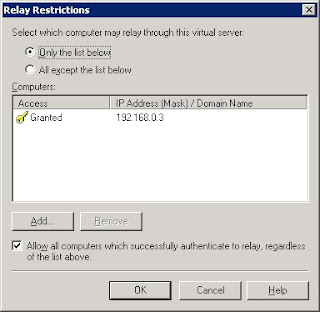
 Enter 127.0.0.1 for the IP address and click the DNS Lookup button. It should resolve to the IP address of the server. Select OK.


Confirm the IP address setting and select OK again.


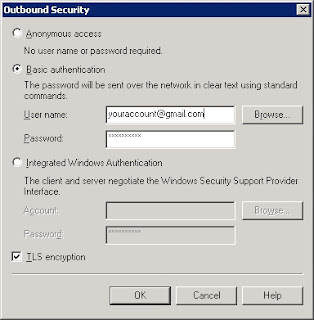
On the Delivery tab, select the Outbound Security button. Select the Basic Authentication option and enter the username and password of your Gmail account. Ensure TLS Encryption is checked. Click OK.


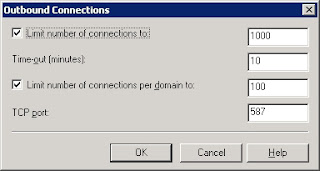
Select the Outbound connections button. Enter 587 for the TCP port and click OK.


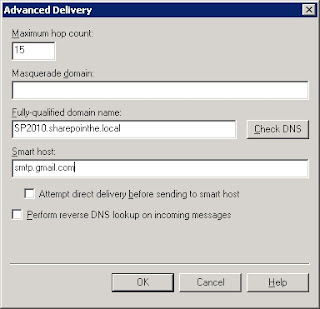
Select the Advanced button. Enter smtp.gmail.com for the smart host and click OK. Click OK again. Exit IIS 6.0 Manager.


4. Configure outgoing email settings in the SharePoint Central Administration site. Enter the IP address of the SMTP server that you just configured. It should be the same IP address as configured in IIS 6.0 above.

Your SharePoint farm should now be able to send outgoing email messages.

Friday, July 8, 2011

SharePoint 2010: "The feature failed to activate because a list at 'Pages' already exists in this site" when trying to activate SharePoint Server Publishing feature on a Meeting Workspace site

When attempting to activate the SharePoint Server Publishing feature on a Meeting Workspace site in SharePoint 2010, you receive the following error message:


Workaround

Open the Meeting Workspace site in SharePoint Designer 2010. Select the All Files folder in the left navigation menu. Rename the pages folder to something like "sitepages".


to


Should be able to successfully activate the SharePoint Server Publishing feature now.

Wednesday, July 6, 2011

Add Quick Launch menu to a Web Part Page in SharePoint 2010

If you want to show the Quick Launch menu (from parent) in a Web Part Page, follow these steps:

1) Open your site in SharePoint Designer 2010.

2) Select the All Files folder (at the bottom of the navigation menu), and then select the document library that holds your web part page(s).

3) Click on the appropriate web part page, and choose to Edit file. Select Advanced Mode in the ribbon to enable editing of the file.

4) Remove the following from your web part page:

 
and
 
 
5) Save the file.