In a SharePoint environment in which you have a one-way trust domain configuration, you discover that the people picker is not resolving all users from other domains as needed.
Here is the fix:
1) On every server in the SharePoint farm, set an encryption key.
2) Clear the existing peoplepicker-searchadforests property for the web application.
3) Set the new peoplepicker-searchadforests property for the web application. The key point here is to add all domains that need to be available in the people picker within the same command.
Format:
Example:
Notes:
- The service account should have Read permissions for each domain, and the service account credentials should be the same for all instances listed in the command.
- In the example above, the third domain (uk.corp.com) is a child domain under corp.com. As you can see, there is no need to add another forest instance if it is a child domain.
Repeat steps 2 and 3 for each web application as needed.
Thursday, October 17, 2013


Wednesday, July 24, 2013
SharePoint 2010 PowerShell: Get all active databases and their ID for a SharePoint farm
Use the following PowerShell command to get all active databases and their associated ID for a SharePoint farm.
Append the out-file cmdlet to send the output to a text file.
Append the out-file cmdlet to send the output to a text file.
Thursday, June 6, 2013
Quick Tip: Ensure modal windows open in front of embedded YouTube videos
When implementing a JavaScript modal window solution (such as TinyBox2) on a SharePoint page that also contains embedded YouTube videos, you may notice that the modal windows open behind the embedded videos. This can be very frustrating. Fortunately, there is an easy fix. In your embed code from YouTube, simply append ?&wmode=transparent to the end of the video URL.
Example:
Example:
Thursday, May 9, 2013
Quick Tip: Clear Text Filter Web Part using Button
When using a Text Filter Web Part to perform wildcard filtering on a List View Web Part, you may notice that filtered results do not clear without manually reloading the page. You can implement a good button solution by adding a Content Editor Web Part to the page with the following HTML:
Done.
Done.
Thursday, March 28, 2013
Project Server 2010: Move PWA site to different/new Web Application
To move your Project Server 2010 PWA site(s) to a different or new web application, follow these steps:
1) If the PWA site is not currently in its own content database, create a new content database in the appropriate web application and move the PWA site there.
2) Document the Published, Draft, Archived, and Reporting content database names for the existing PWA site (in the Project Web App Service Application, select View in the drop-down menu for the PWA site). You will use these same content database names later.
3) Delete (unprovision) the existing PWA site. Be sure to uncheck the box next to "Delete site collection from SharePoint". Wait until the PWA site disappears from the page view.
4) Remove the content database (from Step 1) from the original web application and add it to new web application.
5) Clear the configuration cache in SharePoint 2010. For step-by-step instructions, please see James Waymire's blog post here.
6) If other non-PWA content databases exist in the new web application, set their status to Offline (Application Management, Mange content databases, and click on the content database name).
7) Provision the PWA site in new web application using the same database names documented in step 2.
8) Set existing non-PWA content databases in new web application back to Ready status.
9) Verify PWA site functionality in the new web application.
All done.
1) If the PWA site is not currently in its own content database, create a new content database in the appropriate web application and move the PWA site there.
2) Document the Published, Draft, Archived, and Reporting content database names for the existing PWA site (in the Project Web App Service Application, select View in the drop-down menu for the PWA site). You will use these same content database names later.
3) Delete (unprovision) the existing PWA site. Be sure to uncheck the box next to "Delete site collection from SharePoint". Wait until the PWA site disappears from the page view.
4) Remove the content database (from Step 1) from the original web application and add it to new web application.
5) Clear the configuration cache in SharePoint 2010. For step-by-step instructions, please see James Waymire's blog post here.
6) If other non-PWA content databases exist in the new web application, set their status to Offline (Application Management, Mange content databases, and click on the content database name).
7) Provision the PWA site in new web application using the same database names documented in step 2.
8) Set existing non-PWA content databases in new web application back to Ready status.
9) Verify PWA site functionality in the new web application.
All done.
Wednesday, February 13, 2013
SharePoint 2010 PowerShell: Get the size of each Site Collection in a particular Web Application
Quick Tip -- To get the storage usage of each site collection in a particular web application, use the following command in PowerShell:
Get-SPWebApplication http://webapplicationurl | Get-SPSite -Limit all | select url, @{label="Size in MB";Expression={$_.usage.storage/1MB}} | Sort-Object -Descending -Property "Size in MB" | Format-Table –AutoSize
Have a good day!
Get-SPWebApplication http://webapplicationurl | Get-SPSite -Limit all | select url, @{label="Size in MB";Expression={$_.usage.storage/1MB}} | Sort-Object -Descending -Property "Size in MB" | Format-Table –AutoSize
Have a good day!
Friday, January 4, 2013
SharePoint 2010 FBA and Active Directory: Show Display Name (Friendly Name) for Users
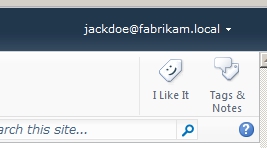
If you have implemented SharePoint 2010 Forms-Based Authentication (FBA) with Active Directory, you will notice the welcome name for each user is their username.
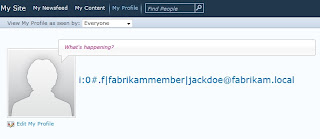
Furthermore, when users create their profile, their Preferred Name is changed to their Claims Identity (sAMAccountName).
Using Trevor Seward's AD LDS/ADAM CodePlex solution and a few configuration changes to the User Profile Service Application, you can get the Display Name (Friendly Name) to show in both cases.
1. Download and deploy Trevor's AD LDS/ADAM CodePlexsolution to your SharePoint farm.
2. In Central Administration, under Application Management, Configure Web Application Settings for the Nauplius AD LDS User Profiles.

3. Select your FBA enabled web application(s) and configure settings as needed. For the Logon attribute, type displayName. IMPORTANT: You must also have an FBA enabled web application with the Logon attribute configured as sAMAccountName. This web application does not need to be actively used, but is critical in showing the correct Display Name for library and list column metadata.
4. Go to your User Profile Service Application and select Manage User Properties. For the Claim User Identifier property, change the import mapping to displayName.

5. Perform a full synchronization of user profiles. Wait until it finishes.
6. Run the Nauplius ADLDS User Profile Import Job under Monitoring, Review Job Definitions. Wait until it finishes. You can view its status under Running Jobs.

When finished, go back to User Profile Service Application. Under Manage User Profiles, you should see both FBA profiles – one for the displayName and one for the sAMAccountName.
7. In the Search Service Application, perform a full crawl of the people content source (sps3) for the Windows Authentication version of each FBA enabled web application.
Display Name should now show correctly for each user.
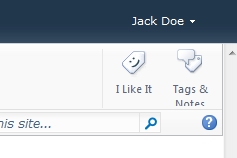
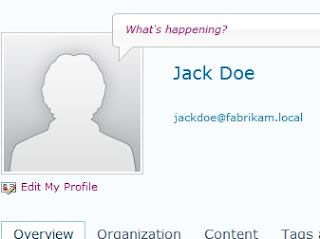
Furthermore, when users create their profile, their Preferred Name is changed to their Claims Identity (sAMAccountName).

Using Trevor Seward's AD LDS/ADAM CodePlex solution and a few configuration changes to the User Profile Service Application, you can get the Display Name (Friendly Name) to show in both cases.
1. Download and deploy Trevor's AD LDS/ADAM CodePlexsolution to your SharePoint farm.
2. In Central Administration, under Application Management, Configure Web Application Settings for the Nauplius AD LDS User Profiles.

3. Select your FBA enabled web application(s) and configure settings as needed. For the Logon attribute, type displayName. IMPORTANT: You must also have an FBA enabled web application with the Logon attribute configured as sAMAccountName. This web application does not need to be actively used, but is critical in showing the correct Display Name for library and list column metadata.
4. Go to your User Profile Service Application and select Manage User Properties. For the Claim User Identifier property, change the import mapping to displayName.

5. Perform a full synchronization of user profiles. Wait until it finishes.
6. Run the Nauplius ADLDS User Profile Import Job under Monitoring, Review Job Definitions. Wait until it finishes. You can view its status under Running Jobs.

When finished, go back to User Profile Service Application. Under Manage User Profiles, you should see both FBA profiles – one for the displayName and one for the sAMAccountName.
7. In the Search Service Application, perform a full crawl of the people content source (sps3) for the Windows Authentication version of each FBA enabled web application.
Display Name should now show correctly for each user.

Wednesday, November 21, 2012
Implementing Anonymous Access and Client Integration without Credential Prompting for Office Files in SharePoint
For those who want the best of both worlds and are trying to use anonymous access for certain content within a single web application while keeping Integrated Windows Authentication and Client Integration enabled for internal users, you may notice that anonymous users will be prompted for credentials when opening Office files in a document library configured for anonymous access.
From my research, I have learned this annoying piece of functionality is actually by design in SharePoint, and the vast majority of bloggers have implemented the most common fix of disabling Client Integration on the web application and denying the OPTIONS verb in the HTTP Verbs tab of Request Filtering on the site in IIS. However, I decided not to implement this most common fix because I discovered it makes all Office files open by default in read-only mode and prevents publishing of InfoPath forms to sites in that web application.
Instead, I opted for the following solution:
1) Download jQuery to your WFE servers in C:\Program Files\Common files\Microsoft Shared\Web Server Extensions\14\TEMPLATE\LAYOUTS\jQuery.
2) Open the site in SharePoint Designer.
3) Under Master Pages, make a copy of the v4.master page, rename it appropriately, and edit it.
4) Add the following lines to the section of your master page:
<script type="text/javascript" src="/_layouts/jQuery/jquery-1.8.2.min.js"></script>
<script type="text/javascript">
function setDownloadHyperlinks()
{
$("a")
.each(function()
{
if (this.href.match(/.doc$/i) || this.href.match(/.docx$/i) || this.href.match(/.pdf$/i) || this.href.match(/.xls$/i) || this.href.match(/.xlsx$/i))
if (this.href.indexOf("/_layouts/download.aspx?SourceUrl=") == -1)
this.href = "/_layouts/download.aspx?SourceUrl=" + this.href;
});
}
</script>
5) Save master page and Set as Default Master Page and Set as Custom Page for the site.
Should now have the best of both worlds.
From my research, I have learned this annoying piece of functionality is actually by design in SharePoint, and the vast majority of bloggers have implemented the most common fix of disabling Client Integration on the web application and denying the OPTIONS verb in the HTTP Verbs tab of Request Filtering on the site in IIS. However, I decided not to implement this most common fix because I discovered it makes all Office files open by default in read-only mode and prevents publishing of InfoPath forms to sites in that web application.
Instead, I opted for the following solution:
1) Download jQuery to your WFE servers in C:\Program Files\Common files\Microsoft Shared\Web Server Extensions\14\TEMPLATE\LAYOUTS\jQuery.
2) Open the site in SharePoint Designer.
3) Under Master Pages, make a copy of the v4.master page, rename it appropriately, and edit it.
4) Add the following lines to the section of your master page:
<script type="text/javascript" src="/_layouts/jQuery/jquery-1.8.2.min.js"></script>
<script type="text/javascript">
function setDownloadHyperlinks()
{
$("a")
.each(function()
{
if (this.href.match(/.doc$/i) || this.href.match(/.docx$/i) || this.href.match(/.pdf$/i) || this.href.match(/.xls$/i) || this.href.match(/.xlsx$/i))
if (this.href.indexOf("/_layouts/download.aspx?SourceUrl=") == -1)
this.href = "/_layouts/download.aspx?SourceUrl=" + this.href;
});
}
</script>
5) Save master page and Set as Default Master Page and Set as Custom Page for the site.
Should now have the best of both worlds.
Subscribe to:
Posts (Atom)