Quick Tip -- To get the storage usage of each site collection in a particular web application, use the following command in PowerShell:
Get-SPWebApplication http://webapplicationurl | Get-SPSite -Limit all | select url, @{label="Size in MB";Expression={$_.usage.storage/1MB}} | Sort-Object -Descending -Property "Size in MB" | Format-Table –AutoSize
Have a good day!
Wednesday, February 13, 2013


Friday, January 4, 2013
SharePoint 2010 FBA and Active Directory: Show Display Name (Friendly Name) for Users
If you have implemented SharePoint 2010 Forms-Based Authentication (FBA) with Active Directory, you will notice the welcome name for each user is their username.
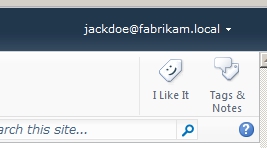
Furthermore, when users create their profile, their Preferred Name is changed to their Claims Identity (sAMAccountName).
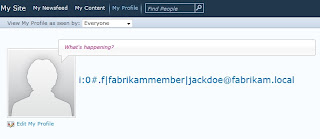
Using Trevor Seward's AD LDS/ADAM CodePlex solution and a few configuration changes to the User Profile Service Application, you can get the Display Name (Friendly Name) to show in both cases.
1. Download and deploy Trevor's AD LDS/ADAM CodePlexsolution to your SharePoint farm.
2. In Central Administration, under Application Management, Configure Web Application Settings for the Nauplius AD LDS User Profiles.

3. Select your FBA enabled web application(s) and configure settings as needed. For the Logon attribute, type displayName. IMPORTANT: You must also have an FBA enabled web application with the Logon attribute configured as sAMAccountName. This web application does not need to be actively used, but is critical in showing the correct Display Name for library and list column metadata.
4. Go to your User Profile Service Application and select Manage User Properties. For the Claim User Identifier property, change the import mapping to displayName.

5. Perform a full synchronization of user profiles. Wait until it finishes.
6. Run the Nauplius ADLDS User Profile Import Job under Monitoring, Review Job Definitions. Wait until it finishes. You can view its status under Running Jobs.

When finished, go back to User Profile Service Application. Under Manage User Profiles, you should see both FBA profiles – one for the displayName and one for the sAMAccountName.
7. In the Search Service Application, perform a full crawl of the people content source (sps3) for the Windows Authentication version of each FBA enabled web application.
Display Name should now show correctly for each user.
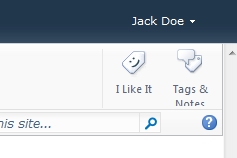
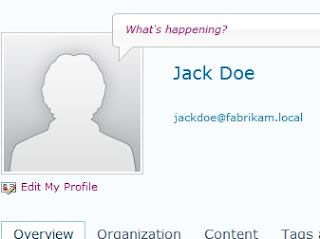
Furthermore, when users create their profile, their Preferred Name is changed to their Claims Identity (sAMAccountName).

Using Trevor Seward's AD LDS/ADAM CodePlex solution and a few configuration changes to the User Profile Service Application, you can get the Display Name (Friendly Name) to show in both cases.
1. Download and deploy Trevor's AD LDS/ADAM CodePlexsolution to your SharePoint farm.
2. In Central Administration, under Application Management, Configure Web Application Settings for the Nauplius AD LDS User Profiles.

3. Select your FBA enabled web application(s) and configure settings as needed. For the Logon attribute, type displayName. IMPORTANT: You must also have an FBA enabled web application with the Logon attribute configured as sAMAccountName. This web application does not need to be actively used, but is critical in showing the correct Display Name for library and list column metadata.
4. Go to your User Profile Service Application and select Manage User Properties. For the Claim User Identifier property, change the import mapping to displayName.

5. Perform a full synchronization of user profiles. Wait until it finishes.
6. Run the Nauplius ADLDS User Profile Import Job under Monitoring, Review Job Definitions. Wait until it finishes. You can view its status under Running Jobs.

When finished, go back to User Profile Service Application. Under Manage User Profiles, you should see both FBA profiles – one for the displayName and one for the sAMAccountName.
7. In the Search Service Application, perform a full crawl of the people content source (sps3) for the Windows Authentication version of each FBA enabled web application.
Display Name should now show correctly for each user.

Wednesday, November 21, 2012
Implementing Anonymous Access and Client Integration without Credential Prompting for Office Files in SharePoint
For those who want the best of both worlds and are trying to use anonymous access for certain content within a single web application while keeping Integrated Windows Authentication and Client Integration enabled for internal users, you may notice that anonymous users will be prompted for credentials when opening Office files in a document library configured for anonymous access.
From my research, I have learned this annoying piece of functionality is actually by design in SharePoint, and the vast majority of bloggers have implemented the most common fix of disabling Client Integration on the web application and denying the OPTIONS verb in the HTTP Verbs tab of Request Filtering on the site in IIS. However, I decided not to implement this most common fix because I discovered it makes all Office files open by default in read-only mode and prevents publishing of InfoPath forms to sites in that web application.
Instead, I opted for the following solution:
1) Download jQuery to your WFE servers in C:\Program Files\Common files\Microsoft Shared\Web Server Extensions\14\TEMPLATE\LAYOUTS\jQuery.
2) Open the site in SharePoint Designer.
3) Under Master Pages, make a copy of the v4.master page, rename it appropriately, and edit it.
4) Add the following lines to the section of your master page:
<script type="text/javascript" src="/_layouts/jQuery/jquery-1.8.2.min.js"></script>
<script type="text/javascript">
function setDownloadHyperlinks()
{
$("a")
.each(function()
{
if (this.href.match(/.doc$/i) || this.href.match(/.docx$/i) || this.href.match(/.pdf$/i) || this.href.match(/.xls$/i) || this.href.match(/.xlsx$/i))
if (this.href.indexOf("/_layouts/download.aspx?SourceUrl=") == -1)
this.href = "/_layouts/download.aspx?SourceUrl=" + this.href;
});
}
</script>
5) Save master page and Set as Default Master Page and Set as Custom Page for the site.
Should now have the best of both worlds.
From my research, I have learned this annoying piece of functionality is actually by design in SharePoint, and the vast majority of bloggers have implemented the most common fix of disabling Client Integration on the web application and denying the OPTIONS verb in the HTTP Verbs tab of Request Filtering on the site in IIS. However, I decided not to implement this most common fix because I discovered it makes all Office files open by default in read-only mode and prevents publishing of InfoPath forms to sites in that web application.
Instead, I opted for the following solution:
1) Download jQuery to your WFE servers in C:\Program Files\Common files\Microsoft Shared\Web Server Extensions\14\TEMPLATE\LAYOUTS\jQuery.
2) Open the site in SharePoint Designer.
3) Under Master Pages, make a copy of the v4.master page, rename it appropriately, and edit it.
4) Add the following lines to the section of your master page:
<script type="text/javascript" src="/_layouts/jQuery/jquery-1.8.2.min.js"></script>
<script type="text/javascript">
function setDownloadHyperlinks()
{
$("a")
.each(function()
{
if (this.href.match(/.doc$/i) || this.href.match(/.docx$/i) || this.href.match(/.pdf$/i) || this.href.match(/.xls$/i) || this.href.match(/.xlsx$/i))
if (this.href.indexOf("/_layouts/download.aspx?SourceUrl=") == -1)
this.href = "/_layouts/download.aspx?SourceUrl=" + this.href;
});
}
</script>
5) Save master page and Set as Default Master Page and Set as Custom Page for the site.
Should now have the best of both worlds.
Thursday, October 18, 2012
Append Created Date Column to Document Name using SharePoint Workflow
I recently had a request to change the names of documents in a document library based on a certain time interval. The requirement was to simply append the document creation date to the original name of the document, preceded with an underscore. To accomplish this need, you must first create a calculated column that converts the Created column format to a text format:

Next, create the Workflow using SharePoint Designer. In the drop-down list of Actions, select to Set Workflow Variable. Give the variable a name, and select the String Builder button. Add the Name column, not the Name (for use in forms) or Name (linked to document with edit menu) columns, type an underscore (_), and add the newly created calculated column for creation date.

Next, in the drop-down list of Actions, select to Set Field in Current Item. Set the field to the Name (for use in forms) column and the value to the variable source, which can be seen by selecting Workflow Variables and Parameters as the data source. Lastly, add logic to stop the Workflow.

Save and Publish the Workflow.

Next, create the Workflow using SharePoint Designer. In the drop-down list of Actions, select to Set Workflow Variable. Give the variable a name, and select the String Builder button. Add the Name column, not the Name (for use in forms) or Name (linked to document with edit menu) columns, type an underscore (_), and add the newly created calculated column for creation date.

Next, in the drop-down list of Actions, select to Set Field in Current Item. Set the field to the Name (for use in forms) column and the value to the variable source, which can be seen by selecting Workflow Variables and Parameters as the data source. Lastly, add logic to stop the Workflow.

Save and Publish the Workflow.
Incoming email attachments not triggering Workflow in SharePoint 2010
Quick Tip: If you are experiencing an issue of email attachments not triggering a Workflow on an email enabled document library in SharePoint 2010, run the following STSADM command in your environment:
stsadm -o setproperty -pn declarativeworkflowautostartonemailenabled -pv true
Should fix the issue.
stsadm -o setproperty -pn declarativeworkflowautostartonemailenabled -pv true
Should fix the issue.
Friday, August 17, 2012
SharePoint 2010 sites experience ‘An unexpected error has occurred’ upon connecting to a User Profile Service Application published from another farm
Issue
Upon establishing a User Profile Service Application Proxy connection to a User Profile Service Application published from another farm, your SharePoint 2010 sites crash with the dreaded unexpected error message:

Upon reviewing the ULS logs, you will notice there is also a login failed error related to the database associated with the User Profile Service Application on the publishing farm:
System.Data.SqlClient.SqlException: Cannot open database "" requested by the login. The login failed. Login failed for user ''.
SqlError: 'Login failed for user ''.' Source: '.Net SqlClient Data Provider' Number: 18456 State: 1 Class: 14 Procedure: '' LineNumber: 65536 Server: ','
I have noticed this issue occurs primarily when using SQL aliasing.
Solution
Upon establishing a User Profile Service Application Proxy connection to a User Profile Service Application published from another farm, your SharePoint 2010 sites crash with the dreaded unexpected error message:

Upon reviewing the ULS logs, you will notice there is also a login failed error related to the database associated with the User Profile Service Application on the publishing farm:
System.Data.SqlClient.SqlException: Cannot open database "
SqlError: 'Login failed for user '
I have noticed this issue occurs primarily when using SQL aliasing.
Solution
1)
Create a SQL alias on the consuming farm that
matches the alias on the publishing farm. For example, if you have an alias
name of SQLDev on the publishing
farm, create an alias with the name of SQLDev
on the consuming farm, both pointing to database server for the publishing
farm.
2)
Restart IIS on each server in the consuming farm. iisreset /noforce.
3)
Restart the Timer service on each server in the consuming
farm. net stop sptimerv4 and net start sptimerv4.
Thursday, July 5, 2012
PowerShell: Enumerate and Export User Profiles and Properties in SharePoint 2010
Good stuff for this latest blog post from me.
I recently had a request to validate the value of a particular set of properties for all user profiles in SharePoint 2010. PowerShell to the rescue! Save the following script to a .ps1 file.
[void][System.Reflection.Assembly]::LoadWithPartialName("Microsoft.Office.Server")
[void][System.Reflection.Assembly]::LoadWithPartialName("Microsoft.Office.Server.UserProfiles")
[void][System.Reflection.Assembly]::LoadWithPartialName("Microsoft.SharePoint")
# SharePoint site URL
$site = new-object Microsoft.SharePoint.SPSite("http://site");
$ServiceContext = [Microsoft.SharePoint.SPServiceContext]::GetContext($site);
$ProfileManager = new-object Microsoft.Office.Server.UserProfiles.UserProfileManager($ServiceContext)
$AllProfiles = $ProfileManager.GetEnumerator()
write-output "Display Name; AccountName; Supervisor"
foreach($profile in $AllProfiles)
{
$DisplayName = $profile.DisplayName
$AccountName = $profile[[Microsoft.Office.Server.UserProfiles.PropertyConstants]::AccountName].Value
$Supervisor = $profile["Supervisor"].value
write-output "$($DisplayName); $($AccountName); $($Supervisor)"
}
write-output "Finished."
$site.Dispose()
In my example above, I am getting the value for three properties: Display Name, Account Name, and Supervisor.
For the list of PropertyConstants members, see the following link:
http://msdn.microsoft.com/en-us/library/microsoft.office.server.userprofiles.propertyconstants_members.aspx
Export the output of this script to a CSV file by appending > filename.csv to the command. Therefore, the entire PowerShell command would be:
.\filename.ps1 > filename.csv
I recently had a request to validate the value of a particular set of properties for all user profiles in SharePoint 2010. PowerShell to the rescue! Save the following script to a .ps1 file.
[void][System.Reflection.Assembly]::LoadWithPartialName("Microsoft.Office.Server")
[void][System.Reflection.Assembly]::LoadWithPartialName("Microsoft.Office.Server.UserProfiles")
[void][System.Reflection.Assembly]::LoadWithPartialName("Microsoft.SharePoint")
# SharePoint site URL
$site = new-object Microsoft.SharePoint.SPSite("http://site");
$ServiceContext = [Microsoft.SharePoint.SPServiceContext]::GetContext($site);
$ProfileManager = new-object Microsoft.Office.Server.UserProfiles.UserProfileManager($ServiceContext)
$AllProfiles = $ProfileManager.GetEnumerator()
write-output "Display Name; AccountName; Supervisor"
foreach($profile in $AllProfiles)
{
$DisplayName = $profile.DisplayName
$AccountName = $profile[[Microsoft.Office.Server.UserProfiles.PropertyConstants]::AccountName].Value
$Supervisor = $profile["Supervisor"].value
write-output "$($DisplayName); $($AccountName); $($Supervisor)"
}
write-output "Finished."
$site.Dispose()
In my example above, I am getting the value for three properties: Display Name, Account Name, and Supervisor.
For the list of PropertyConstants members, see the following link:
http://msdn.microsoft.com/en-us/library/microsoft.office.server.userprofiles.propertyconstants_members.aspx
Export the output of this script to a CSV file by appending > filename.csv to the command. Therefore, the entire PowerShell command would be:
.\filename.ps1 > filename.csv
Thursday, May 3, 2012
Filter Announcements List by Month in SharePoint
To filter an announcements list by month on a MOSS 2007 or SharePoint 2010 site, I like to create a new calculated column based on the Created column in the list, and then create filtered views for each month.
1) Create a new calcluated column named Month, and use the following formula:
=TEXT(Created,"yyyy - ")&TEXT(Created,"mm")&TEXT(Created," (mmmm")&TEXT(Created," yyyy)")

The resulting column output will look like this: 2012 - 05 (May 2012)
2) Create a new view for each month.
On the list, go to Settings, Create View, Standard View. Give it a name. Configure your filter options as shown here:

All done.
1) Create a new calcluated column named Month, and use the following formula:
=TEXT(Created,"yyyy - ")&TEXT(Created,"mm")&TEXT(Created," (mmmm")&TEXT(Created," yyyy)")

The resulting column output will look like this: 2012 - 05 (May 2012)
2) Create a new view for each month.
On the list, go to Settings, Create View, Standard View. Give it a name. Configure your filter options as shown here:

All done.
Subscribe to:
Posts (Atom)